
A Group Template in gPanel acts as a master blueprint for your organization’s communication and security. Rather than manually adjusting complex permission settings every time a new group is needed, templates allow you to pre-define the behavior of a group based on its intent — whether it’s a public-facing support alias or a restricted internal security group.
Utilizing templates ensures domain-wide consistency, simplifies the administrative workflow, and significantly reduces the risk of "configuration drift."
Step-by-Step: Creating a Group Template in gPanel
-
Navigate to Directory > Group Templates. Then, click Add in the top right corner.

-
Go through each section and configure the settings.
-
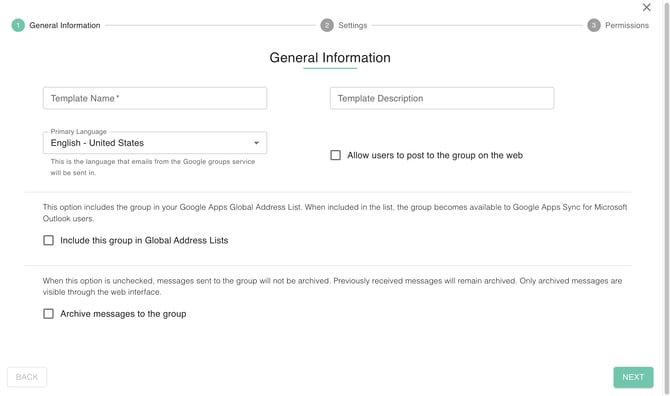
General Information
-
Template Name: This will be the primary name for every dropdown
-
Group's Primary Language: This is the language emails from the Google groups service will be sent in.
-
Template Description: This is optional anything that describe the template
-
Posting Options: Checking the box allows users to post to the group on the web.
-
Global Address List: Include this group in Global Address Lists: This option includes the group in your Google Workspace Global Address List. When included in the list, the group becomes available to Google Workspace Sync for Microsoft Outlook users.
-
Archive Options: Archive messages to the group: When this option is unchecked, messages sent to the group will not be archived. Previously received messages will remain archived. Only archived messages are visible through the web interface.
-
-
Settings
-
Can Post as Group: Check this box to allow members to post as the group
-
Moderate Messages: Select whether or not to moderate group messages by members or non-members
-
Rejected Author Notification: Check this box to notify authors when moderators reject their posts.
-
Rejection Messages: Insert rejection message once this is enabled
-
Spam Messages: Select how spam messages should be handled
-
Post Replies: Select how replies to posts can be sent

-
-
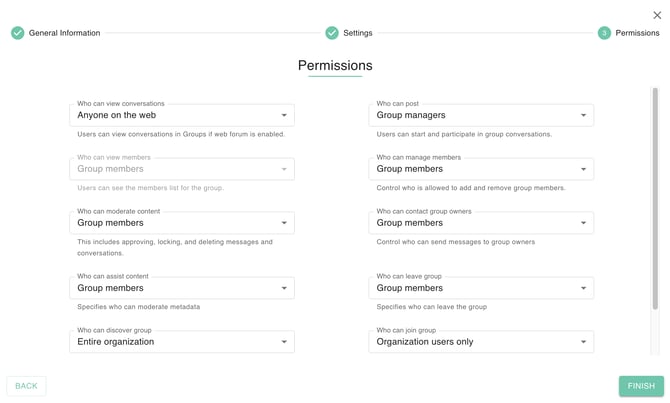
Permissions
-
Who can View Conversations: Select which users can view all conversations.
-
Who Can Post: Select which users can post content to groups.
-
Who Can View Members: Select which users can view former and new members.
-
Who Can Manage Members : Select which users can add and remove group members
-
Who Can Moderate Content: Select which users can approve, delete, and lock messages and/or conversations
-
Who Can Contact Group owners: Select users who can reach, view and send messages and call group owners
-
Who Can Assist Content: Who manages assisting posts
-
Who Can Leave Group: Select who is the allowed users outside/inside organization to leave the group
-
Who Can Discover Group: Select who is the allowed users outside organization to discover the group
-
Who Can Join Group: Select who is the allowed users to join the group
-
Who Can Moderate Members: Select which users can add and remove group members
-
Allow Users Not in Domain: check this if anything can be visible to public.
-
-
-
Once you have completed configuring the settings of your group template, click Finish.
Your new template will now be available in the dropdown menu whenever a new group is created, ensuring a secure and standardized setup every time.