Contents
In Google Workspace, the Organizational Unit (OU) is the bedrock of your domain’s hierarchical structure. Unlike Groups, which are used for communication and access, OUs are used to determine which policies are applied to which users.
For example, you might want your Marketing team to have access to YouTube, while your Finance team is restricted for security reasons. By creating a granular OU structure in gPanel, you can "inherit" or "override" settings from the top-level organization, giving you precise control over the user experience and domain security.
Planning Your OU Hierarchy
Before you begin creating OUs, it is a best practice to plan your hierarchy. Most organizations choose one of two paths:
-
Departmental: Creating OUs for "Sales," "Engineering," and "HR."
-
Geographical: Creating OUs for "North America," "EMEA," and "APAC."
By defining a clear Parent Organization, you can ensure that broad security settings (like forced Multi-Factor Authentication) trickle down to all sub-OUs, while specific departmental needs are handled at the lower levels.
Step-by-Step: Provisioning a New OU
To build out your domain structure within the gPanel dashboard, follow these instructions:
-
Navigate to Directory > Organizational Units.
-
Click the Add (plus) icon located near the top left-hand corner of the screen.

-
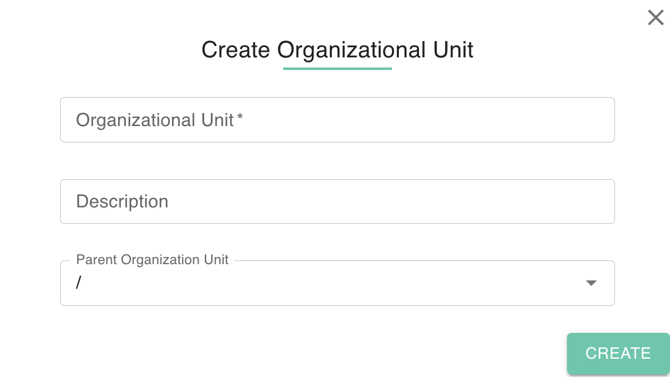
A dialog box will appear with the following fields:
-
Organization Name (Required): Enter a clear, descriptive name for the unit.
-
Description (Optional): We highly recommend adding a description to explain the purpose of the OU (e.g., "Contractor accounts with restricted Drive access"). This provides vital context for other administrators during future audits.
-
Parent Organization: Use the dropdown to select where this OU fits in your hierarchy. If no parent is selected, it will be created directly under your top-level domain.
-
-
Review your settings and click Create.