
Contents
Here are all the actions administrators can take in gPanel to manage their users' calendars.
View a user's calendars
-
Go to the user's calendar’s tab.
-
You can see all the calendars available to the user.

Add a new calendar
-
Click the Add Calendar in the upper right corner.
-
Enter the following information for the user's new calendar and click Create.
-
Name
-
Location
-
Timezone
-
Description
-


Delete a calendar
-
Select the calendar from the user's list of calendars. Click the trashcan icon in the upper right corner.
-
In the confirmation window, click Delete.

Transfer Calendar Ownership
-
Select the calendar from the user's list of calendars. Click the transfer icon in the upper right corner.
-
Select user transfer from and to on the dropdown
-
In the dialog box, click Transfer.
Edit calendar information
-
Select the calendar to edit from the list of the user's calendars. Select Action > Edit, From there you can edit the following information:
-
Title
-
Location
-
Timezone
-
Color
-
Description
-
If the calendar is shown to other users
-
-
Click Edit to save any changes made to the calendar.

-
Share Calendar
Select the calendar you'd like to Share from the list of the user's calendars.
-
Click the action menu, Click on Share to open the share options.
- The sharing dialog popup will appear. From here you can:
-
Change the default visibility level
-
Change share settings for existing shares
-
Remove existing shares
-
Add new shares

-
Change the default visibility level
-
In the Sharing Settings menu, click Change.

-
Select the desired visibility option. There are 3 options to choose from:
-
Public on the web: Anyone on the Internet can find and access. No sign-in required.
-
Anyone on your domain: People at your domain can find and access.
-
Private: Only people explicitly granted permission can access. Sign-on required.
-
-
Select the access level as viewer or free busy viewer.
-
Viewer: Users with the resource added can see all event details of any booked on the resource, even if they were not invited.
-
Free busy viewer: Users with this calendar added can see events booked but not the details of them. It simply shows as "Busy" to those without an direct share or invite to the events.

-
- Click Save to save your changes.
Change the share settings for existing shares
-
In the Share Dialog box of the selected user, Click on the dropdown menu to the right of their name.
-
Select the desired option from owner, editor, viewer, or free busy viewer.
-
Click Update to save your changes.

Remove existing shares
-
In the Share Dialog box of the selected user
-
Click on the X next to their name.
-
Click Save Changes to save your changes.

Add new shares
-
Enter the email address(es) of the user(s) or group(s) that you would like to add to the calendar in the search of user or group field.
-
Select the visibility you would like the new shares to have.
-
Click Share & Save to save your changes.

Events
Select the calendar to create and view event from the list of the user's calendars. Select Action > Event, The sharing calendar will appear. From here you can:- Select Viewing of Calendar
- Browse Calendar
- Create Event

Select Viewing of Calendar
Provides users with flexibility to switch the calendar's display to show a high-level Month view, a focused Week view, or a detailed Day view, depending on their scheduling needs.
- To change the level of detail, click the button labeled MONTH, WEEK, or DAY in the upper right corner.
- The calendar display immediately updates to show events and time slots for the selected period, allowing the user to switch between high-level planning and detailed scheduling.

Browse Calendar
Allows the user to navigate backward and forward through time using the directional arrows, enabling quick viewing of previous or future months, weeks, or days. The "TODAY" button provides a quick return to the current date.
- To move backward or forward in time (e.g., from December 2025 to November 2025 or January 2026), click the left arrow or right arrow next to the month name. Left part.
- To instantly return to the current date (today), click the TODAY button.
- The calendar view shifts one period (month, week, or day) backward or forward, or resets the view to the current date.

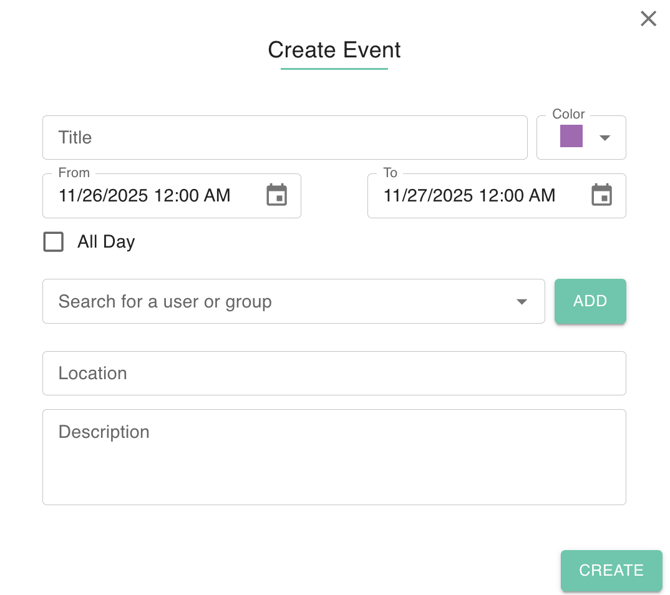
Create Event
Provides a dedicated button to initiate the process of adding a new appointment, meeting, or reminder to the calendar.
OPTION 1: To begin scheduling a new item, click the prominent CREATE EVENT button in the top right corner.
OPTION 2: Alternatively, a user can typically click directly on a desired time slot within the calendar grid (e.g., Wednesday, December 3rd, 2025) to start creating an event for that time.
A pop-up window or new form opens, allowing the user to define a Title, set the specific start and end date/time using the "From" and "To" fields, and choose a Color for categorization. Key functions include inviting attendees by searching for users or groups, setting a Location, adding a detailed Description, and applying an All Day setting if necessary.
History
The Calendar History feature serves as an essential security and compliance tool, providing a detailed audit log of all actions taken on a selected calendar.
Its core function is to maintain a transparent record of activity, showing the exact Date and time of the event, the Performing User (the account responsible for the action), and the precise Action that took place, such as viewing or modifying events.
Furthermore, this log is fully searchable and can be filtered by a specific Date Range, allowing administrators to quickly narrow down the data for troubleshooting or investigation.
